
TL;DR
Build an AI workflow canvas in Vue as an editor and run-monitoring interface, not an execution engine. Use Vue Flow for connected nodes, keep workflow definitions separate from execution runs, and let your backend validate graphs, execute tools, and authorize approvals. We will build a small editable canvas, then define the application contracts needed to make it dependable.
An AI workflow canvas needs to answer two different questions: “What should happen?” and “What is happening in this run?” Mixing those answers makes a failed tool call look like a broken workflow definition, or lets a configuration edit silently change something already awaiting approval.
We will use a publishing workflow: an agent drafts content, a branch decides whether publication is requested, a person reviews the proposal, and a tool publishes the approved version. The other branch archives the draft without publishing it.
DOM Studio’s Flowchart designer demo provides the visual starting point. Its assembly guide establishes the important boundary: the flowchart uses Vue Flow, while the host application owns validation and persistence. The demo does not run workflows.
Table of contents
- Before you start
- 1. Separate the definition, editor session, and run
- 2. Define serializable steps and named connections
- 3. Render an editable AI workflow canvas in Vue
- 4. Add configuration without overloading the cards
- 5. Validate graph changes before saving or publishing
- 6. Project execution events onto the matching run
- 7. Make human approval a backend-controlled boundary
- 8. Persist revisions without overwriting active runs
- 9. Test boundaries before expanding the editor
- FAQ
- Build one trustworthy path first
- Sources
- Recommended Reads
Before you start
You need:
- A Vue application and a browser-rendered editor route. Vue Flow’s setup guide specifies Vue 3.3 or above and Node.js 20 or above.
- Backend endpoints you control for storing definitions, starting runs, receiving events, and recording approval decisions.
- A server-side catalogue of allowed models and tools, with credentials kept outside workflow JSON.
- A product decision about who can edit, run, approve, and publish workflows.
The frontend example targets the Vue Flow 1.48.2 documentation. Install the core and minimap in an existing Vue project, and commit the resolved dependency lockfile:
npm install @vue-flow/core@1.48.2 @vue-flow/minimap
For DOM Studio controls around the canvas, follow the separate DOM Studio installation guide. The example below deliberately uses native inspector fields so the graph integration stays visible.
This is a frontend scaffold plus an application architecture, not a bundled runtime. Authentication, configuration forms, graph validation, persistence, and execution transport are integrations we must supply.
1. Separate the definition, editor session, and run
Start with three records rather than one oversized graph object.
| Record | What belongs here | What does not |
|---|---|---|
| Workflow definition | Stable node IDs, connections, configuration, schema version, revision | Current run status or approval decisions |
| Editor session | Selected step, open inspector, viewport, unsaved edits | Execution authority |
| Workflow run | Definition revision, step attempts, events, outputs, approval requests | Changes to the published definition |
We recommend immutable published revisions. A run references a specific revision, even if someone starts editing the next draft while that run is paused.
The backend consumes the definition and emits run events. The canvas projects those events onto the matching nodes; moving a card does not execute it, and displaying an approved badge does not authorize a tool.
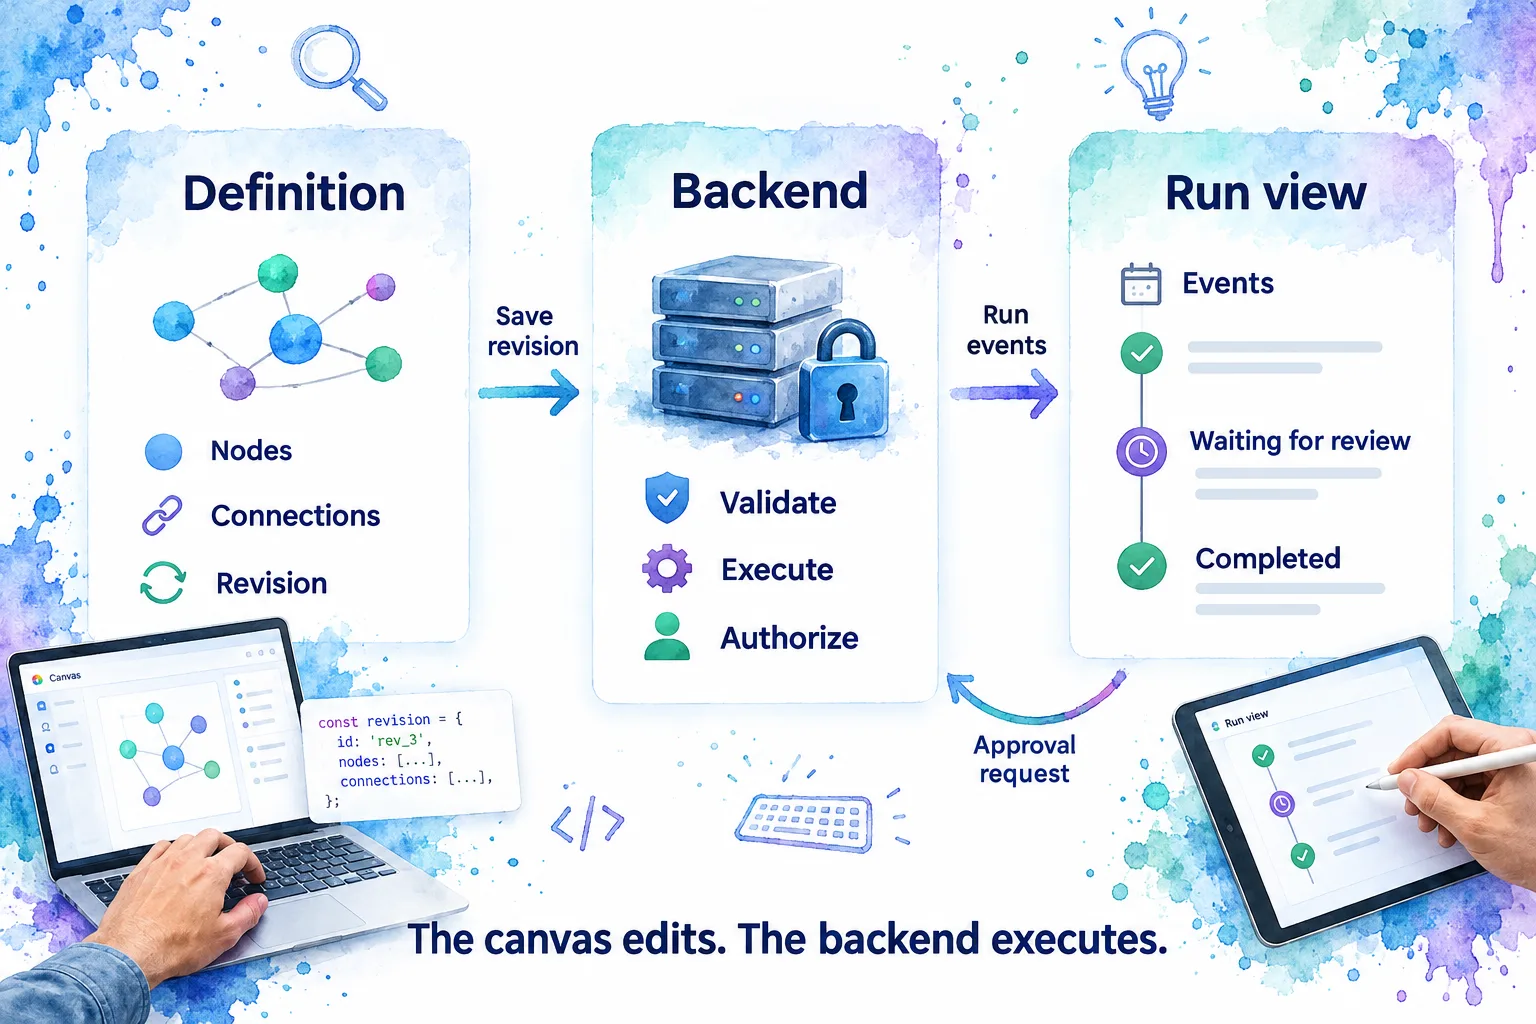
Check: create two runs from one revision. A failure in the first must not change the second run’s status or mark the definition itself as failed. If it does, move execution state out of the persisted node configuration.
2. Define serializable steps and named connections
Give every node a stable ID, a kind, a label, a position, and kind-specific configuration. Give connections their own IDs and explicit source and target ports. Vue Flow’s node documentation explains the position and data structure; our AI semantics are application-owned.
For example, this is an application-level approval record, not a DOM Studio approval API:
{
  "id": "review",
  "kind": "approval",
  "label": "Review publication",
  "position": { "x": 520, "y": 0 },
  "config": {
    "reviewerRole": "publisher",
    "artifactRef": "draft-to-publish",
    "onReject": "stop",
    "timeoutSeconds": 86400
  }
}
Use a small contract for each kind:
- Agent: an allowed model reference, prompt revision, expected output shape, and execution limits.
- Tool: an allowlisted tool key, input bindings, and a server-enforced permission policy.
- Branch: a constrained predicate and named outputs such as
publishandarchive. - Approval: the eligible reviewer policy, artifact reference, expiry, and rejection behavior.
Keep passwords, tokens, functions, component instances, and arbitrary executable expressions out of this JSON. Prefer a limited predicate language evaluated by your backend over accepting JavaScript from the editor.
At the document level, add schemaVersion, workflowId, entryNodeId, and revision. Map the domain record’s kind and config into the renderer’s data field; do not make a UI library’s complete internal node object your permanent business schema.
Check: serialize a definition, parse it, and compare stable IDs, configuration, and connection ports. Unexpected missing values usually mean executable or UI-only objects entered the model.
3. Render an editable AI workflow canvas in Vue
Open the Flowchart designer first. It demonstrates movable HTML steps, connections, an inspector, zoom controls, a minimap, and JSON export. Its current demo keeps edits in the tab, so export before leaving.
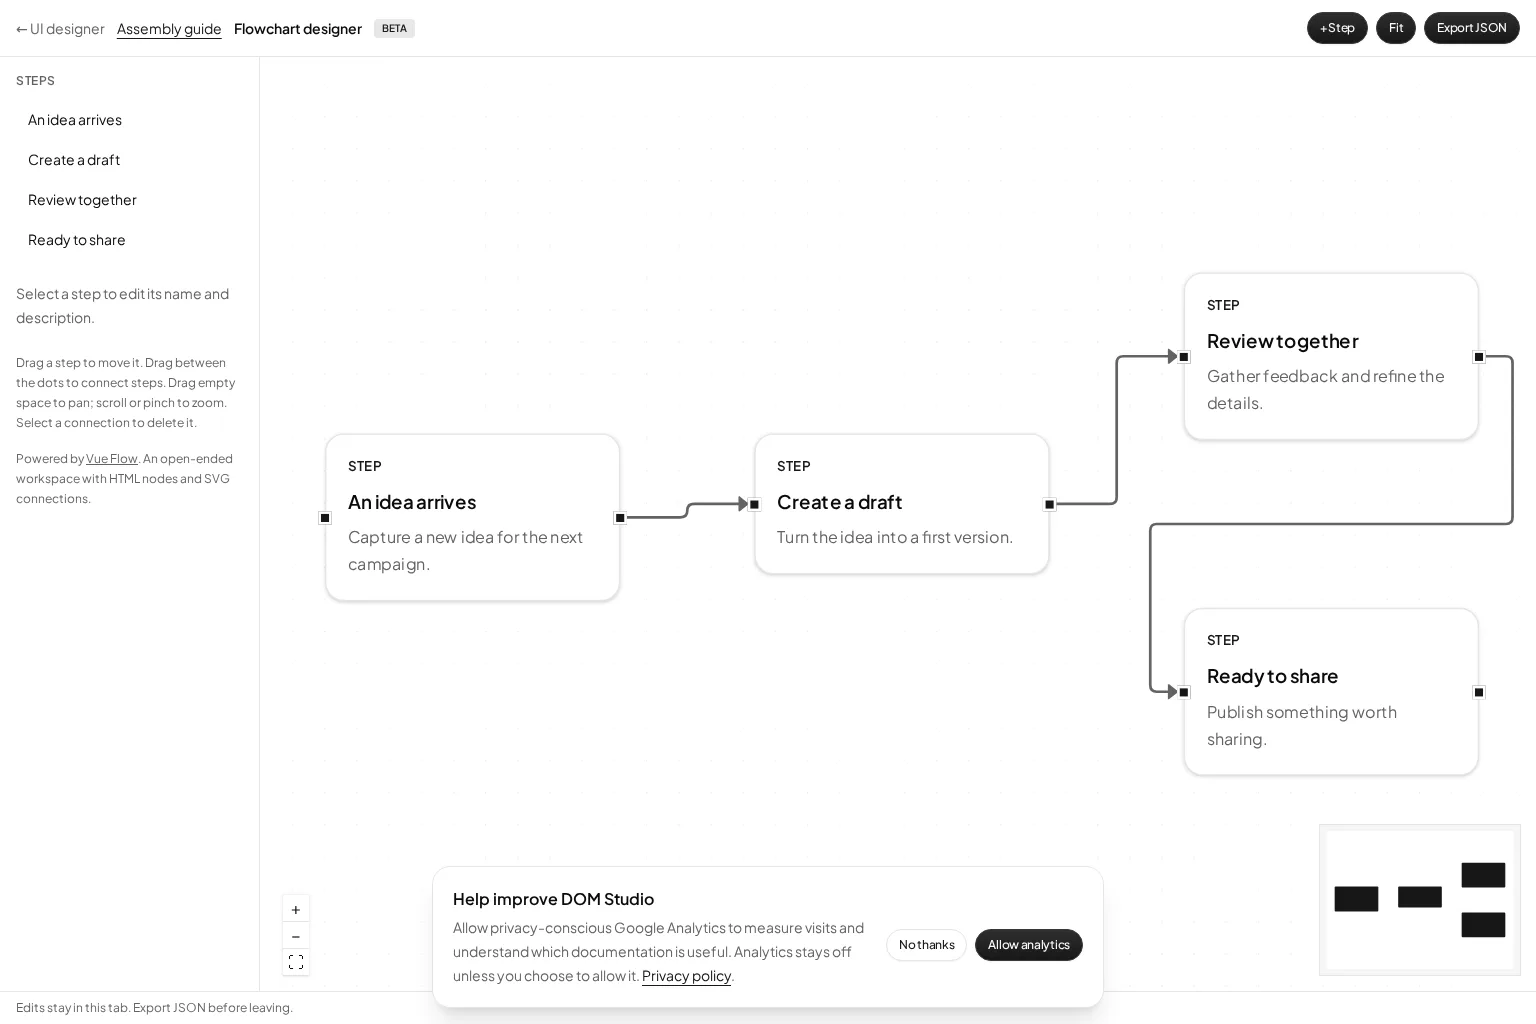
DOM Studio’s generic flowchart demo. The AI step meanings and backend integration are additions we build in the host application.
Vue Flow supports custom node slots, named handles, and reactive node data. Its handle guide documents strict source-to-target connections, while the MiniMap guide covers the separate component and stylesheet. The selection handler uses the documented node mouse event payload; connection records follow the edge contract.
Put this in App.vue in a client-side Vue starter. In an SSR application, keep the viewport browser-only; the mounted guard below defers rendering until mounting.
<script setup>
import { computed, onMounted, ref } from 'vue';
import { ConnectionMode, Handle, Position, VueFlow } from '@vue-flow/core';
import { MiniMap } from '@vue-flow/minimap';
import '@vue-flow/core/dist/style.css';
import '@vue-flow/core/dist/theme-default.css';
import '@vue-flow/minimap/dist/style.css';

const ready = ref(false);
onMounted(() => { ready.value = true; });

const seeds = [
  ['draft', 'agent', 'Draft content', 0, 80, ['out']],
  ['route', 'branch', 'Publication requested?', 260, 80, ['publish', 'archive']],
  ['review', 'approval', 'Review publication', 520, 0, ['out']],
  ['publish', 'tool', 'Publish approved draft', 780, 0, []],
  ['archive', 'tool', 'Archive draft', 520, 220, []],
];
const nodes = ref(seeds.map(([id, kind, label, x, y, outputs]) => ({
  id,
  type: 'step',
  position: { x, y },
  data: { kind, label, outputs, config: {} },
})));
const edges = ref([
  { id: 'e1', source: 'draft', sourceHandle: 'out', target: 'route', targetHandle: 'in' },
  { id: 'e2', source: 'route', sourceHandle: 'publish', target: 'review', targetHandle: 'in' },
  { id: 'e3', source: 'route', sourceHandle: 'archive', target: 'archive', targetHandle: 'in' },
  { id: 'e4', source: 'review', sourceHandle: 'out', target: 'publish', targetHandle: 'in' },
]);
const selectedId = ref('draft');
const selected = computed(() => nodes.value.find(n => n.id === selectedId.value));
const notice = ref('Select a step to edit its label.');

function connect(connection) {
  const source = nodes.value.find(n => n.id === connection.source);
  const target = nodes.value.find(n => n.id === connection.target);
  const occupied = edges.value.some(e =>
    e.source === connection.source && e.sourceHandle === connection.sourceHandle
  );
  if (!source || !target || source.id === target.id || occupied ||
      !source.data.outputs.includes(connection.sourceHandle) ||
      connection.targetHandle !== 'in') {
    notice.value = 'Choose a free output and another step’s input.';
    return;
  }
  edges.value.push({
    ...connection,
    id: `edge-${source.id}-${connection.sourceHandle}-${target.id}`,
  });
  notice.value = 'Connection added. Full validation is still required before publishing.';
}
</script>

<template>
  <div class="workspace">
    <section class="board" aria-label="Workflow canvas">
      <VueFlow
        v-if="ready"
        id="ai-workflow-editor"
        v-model:nodes="nodes"
        v-model:edges="edges"
        :connection-mode="ConnectionMode.Strict"
        fit-view-on-init
        @connect="connect"
        @node-click="({ node }) => selectedId = node.id"
      >
        <template #node-step="{ data, selected: active }">
          <div class="step" :class="{ active }">
            <Handle id="in" type="target" :position="Position.Left" />
            <small>{{ data.kind }}</small>
            <strong>{{ data.label }}</strong>
            <small>{{ data.outputs.join(' / ') || 'End' }}</small>
            <Handle
              v-for="(port, index) in data.outputs"
              :id="port"
              :key="port"
              type="source"
              :position="Position.Right"
              :style="{ top: `${100 * (index + 1) / (data.outputs.length + 1)}%` }"
            />
          </div>
        </template>
        <MiniMap pannable zoomable />
      </VueFlow>
    </section>
    <aside aria-label="Step configuration">
      <label v-if="selected">
        Step label
        <input v-model="selected.data.label">
      </label>
      <p role="status">{{ notice }}</p>
    </aside>
  </div>
</template>

<style scoped>
.workspace { display: flex; flex-wrap: wrap; gap: 1rem; }
.board { flex: 1 1 36rem; height: 70vh; min-height: 420px; }
aside { flex: 0 1 16rem; }
input { display: block; width: 100%; }
.step { position: relative; width: 170px; padding: 1rem; border: 1px solid #64748b; border-radius: 12px; background: white; color: #0f172a; }
.step strong, .step small { display: block; margin: 0.25rem 0; }
.step.active { outline: 3px solid #2563eb; }
</style>
The connect function performs convenience checks only. It does not detect cycles, validate configuration, or enforce approval boundaries. Do not attach a production Run action until server validation exists.
Expected result: five movable steps, two named branch outputs, a minimap, and an editable selected-step label. The label can change without changing its node ID. If the canvas is blank, check the parent height and required core stylesheet first.
4. Add configuration without overloading the cards
Keep cards compact: kind, readable name, configuration warning, and run status. Put prompts, input mappings, retry limits, and review policies in a separate inspector.
The example initializes empty configuration objects intentionally. Replace those with validated defaults, then choose inspector fields from an allowlisted map keyed by kind. A tool selector should store a stable tool key, not a displayed name or credential. An approval selector should store a policy reference, not trust a client-supplied claim that a user is authorized.
Use the step list as another route into the inspector. Add explicit connection controls there for users who cannot conveniently drag handles, and preserve visible focus after deleting or changing a step. Avoid making the minimap the only navigation mechanism.
The sample fixes the kind of each seed node. If your editor permits changing kinds, treat that as a structural operation: reconcile ports, remove or flag incompatible edges, and revalidate configuration.
Check: rename a step, move it, zoom out, and select it from the list. The same inspector record should open every time. If label edits reset when selection changes, the inspector is probably editing a disconnected copy.
5. Validate graph changes before saving or publishing
Separate incomplete drafts from executable definitions. We can save a draft with a missing prompt if the UI marks it incomplete; publishing or starting a run should require stronger validation.
Have the server validate at least these layers:
- Structure: unique IDs, known kinds, valid positions, existing endpoints, and valid port names.
- Topology: one declared entry, required reachability, permitted terminal steps, and no forbidden cycles.
- Configuration: allowed models and tools, valid input bindings, required branch routes, and valid reviewer policies.
- Safety: every protected action is covered by an appropriate review boundary, and the executor enforces the same requirement at runtime.
For this first build, choose an acyclic graph with one outgoing connection per named output. Agent-internal iterations are not editable graph cycles. Add loop and join semantics only after defining iteration budgets, cancellation, and how multiple inputs synchronize.
Return actionable errors such as route.outputs.archive: connect an archive destination. Attach errors to node or edge IDs so the interface can select the affected item.
Do not accept “there is an approval node somewhere upstream” as proof of protection. Check every relevant path, bind the decision to the proposed action, and enforce it again before execution. OWASP’s transaction authorization guidance supports server-side enforcement and authorization tied to the transaction being confirmed.
Check: draw a direct connection to the publishing tool that bypasses review. The server must reject publication of that definition, even if a modified client submits it successfully.
6. Project execution events onto the matching run
Give the run view its own state map, keyed by run ID, node ID, and attempt. We recommend idle, queued, running, waiting_for_approval, completed, failed, skipped, and cancelled as initial display states.
Define a transport-neutral event envelope in your application. For example:
{
  "eventId": "evt-42",
  "sequence": 42,
  "runId": "run-17",
  "definitionRevision": 8,
  "nodeId": "review",
  "attempt": 1,
  "type": "approval.requested",
  "approvalRequestId": "approval-9"
}
Whether events arrive through polling, server-sent events, or WebSockets is a backend choice. Require a run snapshot and a recovery mechanism, not just a live stream.
Deduplicate events, reject events for another run or revision, and use sequence numbers to detect gaps. On a gap, recover missing events or reload a snapshot before claiming the display is current. Keep attempt histories so a late failure from attempt one cannot overwrite attempt two’s success.
Show tool failures with a safe error summary and retry eligibility. Do not put full credentials, sensitive prompts, or unrestricted tool output into status tooltips. A branch’s unchosen path should be skipped, not mistaken for an indefinitely idle task.
Check: disconnect during execution, reconnect, and replay an event twice. The canvas should converge on the backend’s state without duplicating timeline entries.
7. Make human approval a backend-controlled boundary
Treat approval as a request to authorize a specific proposed action, not as a boolean attached to a node.
When a run reaches review, the backend should persist a waiting state and create an approval request referencing the run, revision, step attempt, proposed artifact, and approval policy. The inspector displays that artifact and its consequences before presenting Approve and Reject actions.
A click submits a decision command. Until the server confirms it, show “Submitting decision,” not “Approved.” The server checks reviewer eligibility, expiry, whether a decision already exists, and whether the artifact still matches what was reviewed. This follows the OWASP recommendation to bind authorization to significant transaction data.
Record the decision and schedule continuation through a durable mechanism, such as a transactional outbox. Give decision submission an idempotency key so a network retry cannot approve or resume the same request twice. A worker must independently confirm the authorization before invoking the protected tool.
Keep these moments distinct:
- Pending: the run is waiting for a valid decision.
- Approved or rejected: the backend has recorded the reviewer’s decision.
- Resumed: execution has actually continued after approval.
Approval does not imply successful publication. Rejection should stop this example’s publication path; expiry must not silently grant consent.
For a broader engineering perspective on meaningful review, watch Angel Ortmann Lee’s talk, Build AI Systems for Discernment, Not Approval. It complements this design discussion rather than documenting the Vue integration.
Check: open one request in two tabs and submit opposite decisions. Only one valid transition should win, with the other tab receiving the authoritative result.
8. Persist revisions without overwriting active runs
Save the domain definition, not the rendered DOM. Store layout positions deliberately, but keep selection and personal viewport preferences outside the published execution contract.
Use optimistic concurrency: send the revision the editor loaded, compare it on the server, and reject conflicting writes instead of silently overwriting another editor. Preserve the user’s unsaved changes so they can reload, compare, and resolve the conflict.
Publishing creates a new immutable revision. Starting a run names that revision explicitly. Editing revision nine must not alter a review request created from revision eight.
Prefer explicit field serialization over storing every property returned by an editor export. Imported JSON needs schema validation, size limits, known node kinds, and migration handling before it becomes editable or executable.
For tool retries, define whether an operation is safe to repeat. A timed-out publishing request may already have succeeded externally, so blindly retrying can duplicate side effects. Use application-specific idempotency and reconciliation rather than interpreting a red node as permission to rerun everything.
Check: save from two editors, reload an old revision, and inspect a still-running historical run. None should silently become another definition.
9. Test boundaries before expanding the editor
Test behavior across the canvas, application API, and executor. Useful fixtures include:
| Scenario | Expected outcome |
|---|---|
| Missing target, unknown port, or duplicate ID | Validation identifies the broken graph item |
| Missing branch destination or forbidden cycle | Draft remains editable; publication is blocked |
| Tool fails after starting | Run shows the failed attempt without changing the definition |
| Event is duplicated or arrives after a retry | Timeline and current attempt remain consistent |
| Reviewer lacks permission | Server rejects the decision regardless of button visibility |
| Proposed artifact changes after review starts | Existing authorization cannot approve the changed action |
| Two reviewers race | One valid decision wins and continuation occurs once |
| Revision changes during editing | Conflict is visible and unsaved work survives |
Also test keyboard navigation, readable status text without color, zoomed layouts, long step names, and an inspector opened on a deleted node. Choose graph-size limits from measurements with representative workflows rather than assuming that an unlimited workspace means unlimited rendering capacity.
Completion check: follow one real draft through branching, review, publication, failure recovery, and reload. The frontend and backend should agree on the revision, artifact, decision, and step attempt throughout.
FAQ
Does DOM Studio execute the AI workflow?
No. The flowchart demo draws and edits a graph. The application supplies execution, storage, validation, and approval enforcement, as described in the assembly guide.
Can we edit a workflow while it is running?
Yes, if we edit a separate draft revision. Keep the active run pinned to its original definition, and make starting a run from the new revision an explicit action.
Is this a complete n8n replacement?
No. This guide builds an application-specific Vue interface. It does not supply a general automation runtime, connector catalogue, scheduler, or hosted execution service.
Build one trustworthy path first
We now have an editable graph and a clear contract for connecting it to execution. The most useful next action is to implement one protected tool call with a real approval request, then test rejection, stale review, and network recovery before adding more node types.
Start with the Flowchart designer demo, use its assembly example as a reference, and follow the installation guide when adding DOM Studio controls around your canvas.
Sources
- DOM Studio: Flowchart designer
- DOM Studio: Build your own designer
- DOM Studio: Installation
- Vue Flow: Getting started
- Vue Flow: Nodes
- Vue Flow: Edges
- Vue Flow: Handles
- Vue Flow: MiniMap
- Vue Flow: Node mouse event contract
- OWASP: Transaction Authorization Cheat Sheet