
Vue Application Templates: How to Build a Reusable Starting Point
Vue application templates should do more than render a polished landing screen. A useful template gives us a repeatable application shell, a clear place for shared state, reusable components, realistic form patterns, and a verification path that catches issues before a second project inherits them.
In this guide, we will turn a fresh Vue project into a reusable application template for dashboards, internal tools, customer portals, and other product interfaces. We will use the standard Vue and Vite workflow, then add only the structure that future teams will actually reuse.
Table of contents
- Before you begin
- 1. Define the template contract before writing UI
- 2. Scaffold the Vue application with the official starter
- 3. Replace the demo structure with an application structure
- 4. Build components as small, documented application primitives
- 5. Establish form and state boundaries early
- 6. Build one representative vertical slice
- 7. Verify the template before anyone depends on it
- 8. Package the outcome for reuse
Before you begin
Have these inputs ready:
- A current Node.js installation and a package manager such as npm, pnpm, or Bun.
- A product surface to model, such as a dashboard, settings area, operations console, or account portal.
- A decision about rendering. For a client-rendered product app, a Vue and Vite template is usually the simplest starting point. If server-side rendering is a core requirement, evaluate a framework such as Nuxt before standardizing the template.
- A list of the views that almost every project will need, for example a signed-in shell, empty state, loading state, error state, and settings form.
The goal is not to predict every feature. It is to create a small, reliable system that makes the next feature easier to add.
1. Define the template contract before writing UI
Start by writing down what the template owns. We recommend treating it as a contract with five layers:
- Application shell: navigation, page frame, responsive behavior, and global feedback.
- Route views: dashboard, list, detail, settings, and authentication boundaries.
- Shared components: buttons, cards, filter controls, empty states, dialogs, and status indicators.
- State and data boundaries: what is local to a view, what belongs in Pinia, and where API calls will live.
- Quality checks: linting, type checks, tests, production build, and responsive review.
Choose one representative route, not a collection of disconnected example pages. A customer-health dashboard or project workspace works well because it forces the template to handle navigation, metrics, lists, actions, and mobile behavior in one place.

Expected result: everyone can explain what is included in the template and what remains product-specific.
Troubleshooting: if the contract has more than a few generic routes or many domain-specific nouns, it is probably an application starter rather than a reusable template. Remove business logic until the structure becomes broadly useful again.
2. Scaffold the Vue application with the official starter
For a new Vue application, start with the official scaffolding tool:
npm create vue@latest
For a reusable application template, we commonly select TypeScript, Vue Router, ESLint, and Prettier. Add Pinia when the template will include shared client state such as session context, global notifications, or cross-route filters. Add unit or end-to-end testing when your team will maintain the template as a shared foundation.
Then install and run the project:
cd your-template-name
npm install
npm run dev
Vue’s official starter creates a Vite-based project using Single-File Components. That is a practical baseline because the generated project can grow into a structured app without bringing in a legacy Vue CLI configuration.
If you prefer to begin from Vite directly, its vue and vue-ts templates are also valid options. We favor create-vue when the team wants the official prompts to make Router, Pinia, testing, linting, and formatting decisions visible at creation time.
Expected result: the local development server opens a default Vue application and hot updates when you edit a component.
Troubleshooting: if scaffolding or Vite refuses to run, check your Node.js version first. If the selected directory already contains files, create the project in a new directory or confirm that overwriting is intentional.
3. Replace the demo structure with an application structure
Do not let the generated demo become the accidental architecture. Keep the project easy to scan by organizing around application responsibilities:
src/
  app/
    AppShell.vue
    app-providers.ts
  components/
    feedback/
    navigation/
    ui/
  features/
    dashboard/
    settings/
  layouts/
    AuthLayout.vue
    DashboardLayout.vue
  router/
    index.ts
  stores/
    session.ts
    notifications.ts
  views/
    DashboardView.vue
    SettingsView.vue
  styles/
    tokens.css
    base.css
Keep views thin. A view should assemble a route, request feature-level data, and coordinate page behavior. Repeated pieces belong in components, while cohesive product behavior belongs in features. This separation prevents a single components directory from becoming a mix of generic buttons, business-specific tables, and entire pages.
For the signed-in experience, make the shell own the desktop navigation, mobile navigation behavior, and main-content scroll area. DOM Studio’s application layout block is a useful reference: it demonstrates a persistent left panel while the work area scrolls independently, which is a common requirement in data-dense application interfaces.
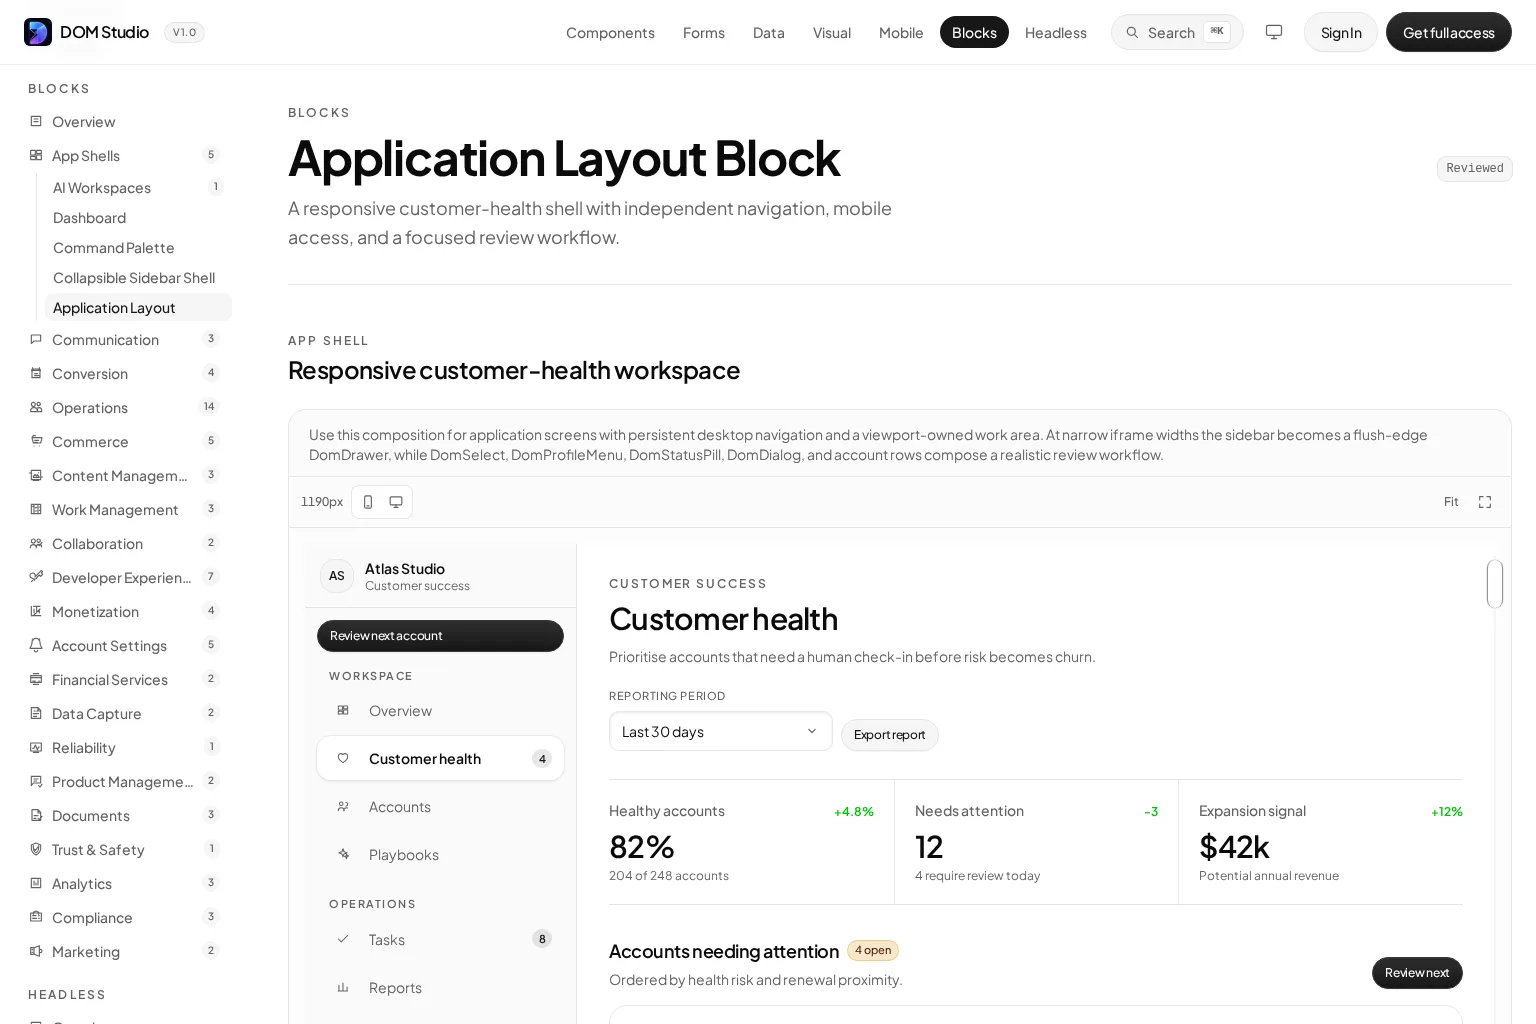
Expected result: a route can render inside a stable shell without copying sidebar or header markup into every view.
Troubleshooting: if changing a navigation component requires edits across several route files, move that component and its configuration into the shell. If every route needs radically different chrome, create separate layouts rather than adding conditionals to one oversized shell.
4. Build components as small, documented application primitives
A template becomes valuable when its UI pieces are easier to reuse than to recreate. Start with primitives that carry behavior and accessibility expectations, not just visual styling:
- Button, icon button, link button, and loading state
- Card, panel, page header, and section heading
- Status pill, empty state, skeleton, toast, and error notice
- Dialog, drawer, dropdown, tabs, and command surface
- Field wrapper, text input, select, checkbox, and validation message
Give each component a focused API. For example, a status pill should accept a finite status value instead of an unlimited collection of display classes:
<script setup lang="ts">
type Tone = 'neutral' | 'success' | 'warning' | 'danger'

defineProps<{
  label: string
  tone?: Tone
}>()
</script>

<template>
  <span class="status-pill" :data-tone="tone ?? 'neutral'">
    {{ label }}
  </span>
</template>
Document the intended use next to the component. That includes its props, slots, events, accessibility behavior, and a working example. At DOM Studio, we approach this as an editable UI system: Vue wrappers, headless elements, application blocks, forms, and component metadata are designed to stay close to the source teams own and ship.
Use a realistic composition to pressure-test the primitive set. For example, the product dashboard block combines cards, dropdowns, status elements, and responsive navigation in one interface. A template that can support a representative dashboard is more likely to hold up when new screens arrive.

Expected result: a new view can be composed primarily from stable components rather than one-off markup.
Troubleshooting: if a component collects many boolean props or page-specific exceptions, split it into a smaller primitive and a feature-level composition. If every component needs a custom style override, improve the design tokens or variant API instead of encouraging arbitrary overrides.
5. Establish form and state boundaries early
Forms are where a superficially reusable starter often breaks down. Decide upfront how fields receive values, report errors, and submit data. We recommend keeping three concerns separate:
- Form definition: labels, field types, required rules, options, and display behavior.
- Form values: the data a person enters or edits.
- Server and request logic: loading existing values, saving changes, and translating API errors.
Keep simple form state in the component or feature that owns it. Use Pinia for state that must survive route changes or coordinate across several views. Do not put every input value into a global store by default.
When forms are a major part of the product, use a system that makes validation and composition consistent. DOM Studio’s form system provides field registration, validation, nested paths, and programmatic updates while allowing the form model to remain regular Vue state. Its schema approach also separates a field definition from the submitted values, which is useful when the same form needs to be generated or configured later.
Here is the boundary we want a template feature to follow:
// features/settings/profile.ts
export type ProfileInput = {
  name: string
  email: string
}

export async function saveProfile(input: ProfileInput) {
  // Call the real API here. Keep transport details out of presentational fields.
  return input
}
Expected result: a field component can display a value and validation state without knowing how the server persists it.
Troubleshooting: if a text input imports an API client or a view contains dozens of validation branches, move request logic into a feature service and keep field-level validation declarative.
6. Build one representative vertical slice
Now make the template prove itself. Build one route end to end using the intended approach:
- Add a route and render it inside the dashboard layout.
- Load mock or local fixture data through a feature module.
- Compose the page from template primitives.
- Include loading, empty, success, and error states.
- Add one editable form or filter control.
- Test the route at desktop and narrow mobile widths.
Do not copy a design from a screenshot without testing the interaction model. A dashboard that looks complete but cannot handle a long navigation label, a loading metric, or an empty list is not a reusable template.
This is also the right time to compare complementary tools. Vite handles the development and build workflow. Vue Router defines client-side navigation. Pinia can coordinate shared client state. For UI implementation, teams may compare component libraries such as Vuetify, PrimeVue, or shadcn-vue with an editable system like DOM Studio. The important question is not which catalog has the most components. It is whether the selected foundation matches your ownership model, design requirements, accessibility standards, and need to customize source over time.
Expected result: the sample route looks like a real product screen and demonstrates the decisions a future feature should copy.
Troubleshooting: if the sample depends on dozens of placeholder components, reduce the scope. A compact, complete vertical slice is more useful than a wide collection of unfinished screens.
7. Verify the template before anyone depends on it
Run a repeatable pre-release check:
npm run build
Also run the lint, type-check, unit-test, and end-to-end-test scripts that your scaffold includes. Open the representative route at a narrow width, use a keyboard to reach every interactive control, test an error response, and confirm that the empty state is understandable.
Then inspect the template as a new team would:
- Can someone identify where to add a route?
- Can they create a new feature without modifying the shell?
- Can they use a component without reading its implementation?
- Can they find the preferred form and state patterns?
- Does the production build complete without warnings that will be inherited by every project?
Expected result: the template produces a production build and provides a clear example for the next application screen.
Troubleshooting: do not mark a template ready because the happy path works locally. Build failures, keyboard gaps, mobile overflow, and confusing folder boundaries become more expensive after several projects copy them.
8. Package the outcome for reuse
Finish with a concise README that answers four questions: how to start the app, how to add a route, how to create a feature, and how to run quality checks. Add a short decision record for major choices such as styling, state management, API conventions, and authentication boundaries.
Your finished Vue application template should now provide a working application shell, reusable UI primitives, a reliable form boundary, one verified representative screen, and a practical path for every future feature. That is enough structure to increase consistency without turning the starter into a framework your team has to fight.
If you want a source-ownable foundation of Vue wrappers, headless elements, application blocks, form tooling, and inspectable component guidance, explore DOM Studio.